Monday, September 29, 2008

Get disk drive type with VB.NET

Sometimes you have to find disk drives of particular type. For example, you may have to search all removable disk drives or network mapped drives with VB.NET.

This sample shows how to check all drives and get their drive type, volume label and check if the drive is ready.

First, create a new standard WinForms project. Drop in a one button control and a one listbox control.

Import System.IO namespace

Imports System.IO

and then add the following declaration and helper procedure after form's declaration

Public Declare Function WNetGetConnection Lib "mpr.dll" Alias "WNetGetConnectionA" _
 (ByVal lpszLocalName As String, ByVal lpszRemoteName As String, ByRef cbRemoteName As Integer) As Integer

Public Function GetNetDriveName(ByVal DriveLetter As String) As String
  '
  ' Return mapped drive UNC name
  Dim RetVal As Integer
  Dim OutName As String = New String(CChar(" "), 260)
  Dim NameLength As Integer = 260

  Try
    RetVal = WNetGetConnection(DriveLetter, OutName, NameLength)
    OutName = OutName.Replace(Chr(0), " ").TrimEnd(CChar(" "))
    Return OutName
  Catch ex As Exception
    Return ""
  End Try

End Function

Mpr.dll is a Windows module which handles communication with installed networked providers. In this case its used in the helper function above to get UNC-name for mapped network drives.

Next is the actual procedure which loops drive letters and returns available information.

Public Sub GetDrives(ByRef DriveLetter() As String, ByRef VolumeLabel() As String, _
  ByRef DriveTypeVal() As DriveType, ByRef PathToDrive() As String, _
  ByRef IsDriveReady() As Boolean)
  '
  ' Return available disc drives
  '
  Const DRIVELETTERS As String = "ABCDEFGHIJKLMNOPQRSTUVWXYZ"
  Dim Info As DriveInfo
  Dim Count As Integer
  Dim i As Integer

  Try
    Count = DRIVELETTERS.Length - 1
    ReDim DriveLetter(Count)
    ReDim VolumeLabel(Count)
    ReDim DriveTypeVal(Count)
    ReDim PathToDrive(Count)
    ReDim IsDriveReady(Count)
    For i = 0 To Count
      DriveLetter(i) = DRIVELETTERS.Substring(i, 1)
      VolumeLabel(i) = ""
      DriveTypeVal(i) = DriveType.Unknown
      PathToDrive(i) = ""
      IsDriveReady(i) = False
    Next i
    For Each Info In My.Computer.FileSystem.Drives
      Count = DRIVELETTERS.IndexOf(Info.RootDirectory.FullName.Substring(0, 1))
      DriveTypeVal(Count) = Info.DriveType
      If Info.IsReady Then
        IsDriveReady(Count) = True
        VolumeLabel(Count) = Info.VolumeLabel
      Else
        IsDriveReady(Count) = False
        VolumeLabel(Count) = ""
      End If
      If Info.DriveType = DriveType.Network Then
        PathToDrive(Count) = GetNetDriveName(DriveLetter(Count) & ":")
      Else
        PathToDrive(Count) = DriveLetter(Count) & ":"
      End If
    Next Info
  Catch ex As Exception
    ' Error handling
  End Try

End Sub

And finally here's the code for Button1. The code call GetGrives-procedure and displays returned information in the ListBox1.

Private Sub Button1_Click(ByVal sender As Object, ByVal e As System.EventArgs) Handles Button1.Click
  '
  ' Get drives and their types
  Dim DriveLetter() As String
  Dim VolumeLabel() As String
  Dim DriveTypeVal() As DriveType
  Dim PathToDrive() As String
  Dim IsDriveReady() As Boolean
  Dim TempStr As String
  Dim i As Integer

  Try
    ReDim DriveLetter(0)
    ReDim VolumeLabel(0)
    ReDim DriveTypeVal(0)
    ReDim PathToDrive(0)
    ReDim IsDriveReady(0)
    GetDrives(DriveLetter, VolumeLabel, DriveTypeVal, PathToDrive, IsDriveReady)
    ListBox1.Items.Clear()
    TempStr = "DriveLetter" & "; "
    TempStr = TempStr & "DriveType" & "; "
    TempStr = TempStr & "VolumeLabel" & "; "
    TempStr = TempStr & "PathToDrive" & "; "
    TempStr = TempStr & "IsDriveReady"
    ListBox1.Items.Add(TempStr)
    For i = 0 To DriveLetter.GetUpperBound(0)
      TempStr = DriveLetter(i) & "; "
      TempStr = TempStr & DriveTypeVal(i).ToString & "; "
      TempStr = TempStr & VolumeLabel(i) & "; "
      TempStr = TempStr & PathToDrive(i) & "; "
      TempStr = TempStr & IsDriveReady(i).ToString
      ListBox1.Items.Add(TempStr)
    Next i
  Catch ex As Exception
    ' Error handling
  End Try

End Sub

The output looks something like this:

DriveLetter; DriveType; VolumeLabel; PathToDrive; IsDriveReady
A; Removable; ; A:; False
B; Unknown; ; ; False
C; Fixed; ; C:; True
D; Fixed; New Volume; D:; True
E; CDRom; ; E:; False
F; Fixed; HD-HCU2; F:; True
G; Fixed; HD-HSU2; G:; True
H; Fixed; MAXTOR; H:; True
I; Removable; PORTABLEAPP; I:; True
J; Unknown; ; ; False
K; Unknown; ; ; False
L; Unknown; ; ; False
M; Unknown; ; ; False
N; Unknown; ; ; False
O; Unknown; ; ; False
P; Unknown; ; ; False
Q; Unknown; ; ; False
R; Unknown; ; ; False
S; Unknown; ; ; False
T; Unknown; ; ; False
U; Unknown; ; ; False
V; Unknown; ; ; False
W; Unknown; ; ; False
X; Unknown; ; ; False
Y; Unknown; ; ; False
Z; Network; Vista; \\Cameron\Public; True

The listing shows that drive A is a removable disk but its not ready (it's a floppy disk drive). Drives C, D, F, G and H are hard disk drives and drive C has no volume label. Drive E is a CD/DVD drive and drive I is also a removable drive (USB memory stick). And finally drive Z is a network mapped drive.

What can you do and do not with this information? First, the only USB drive is drive I because drive letters A and B are assigned to floppy disks even if you do not have one. Second, drive Z's volume label is "Vista" in the PC from which it is shared. The share name is \\Cameron\Public so the server's name is "Cameron" and the shared folder is "Public".

And there's a few things you won't get with this code. First, only two of the five fixed disk drives are internal drives and three drives are external had disk drives, but you can't tell which. At least for sure. Second, drive E is of type "CDRom" but it is actually a writable CD/DVD combo drive. But again, you can't tell the difference with this code.

Do more with DriveInfo class

Now that you know how to get this information. you may experience other properties that DriveInfo class offers. Here's a list of a few interesting properties:

  • Info.AvailableFreeSpace
  • Info.DriveFormat
  • Info.Name
  • Info.TotalFreeSpace
  • Info.TotalSize

Get drives of particular type with Visual Basic.NET

Here is a slight modification to the code above to make it more practical to use in VB.NET. This code gets the required drive type as parameter and returns only matching drives, if any. You may use this code to get only USB memory drives or network mapped drives for example.

Public Sub GetDrivesOfType(ByRef VolumeLabel() As String, _
  ByRef PathToDrive() As String, ByRef IsDriveReady() As Boolean, _
  ByVal DriveTypeVal As DriveType)
  '
  ' Return drives of given type
  Dim Info As DriveInfo
  Dim ThisLetter As Char
  Dim Count As Integer

  Try
    Count = 0
    For Each Info In My.Computer.FileSystem.Drives
      If Info.DriveType = DriveTypeVal Then
        ReDim Preserve VolumeLabel(Count)
        ReDim Preserve PathToDrive(Count)
        ReDim Preserve IsDriveReady(Count)
        ThisLetter = CChar(Info.RootDirectory.FullName.Substring(0, 1))
        If Info.IsReady Then
          IsDriveReady(Count) = True
          VolumeLabel(Count) = Info.VolumeLabel
        Else
          IsDriveReady(Count) = False
          VolumeLabel(Count) = ""
        End If
        If Info.DriveType = DriveType.Network Then
          PathToDrive(Count) = GetNetDriveName(ThisLetter & ":")
        Else
          PathToDrive(Count) = ThisLetter & ":"
        End If
        Count += 1
      End If
    Next Info
  Catch ex As Exception
    ' Error handling
  End Try

End Sub

and you call this procedure:

ReDim VolumeLabel(0)
ReDim PathToDrive(0)
ReDim IsDriveReady(0)
GetDrivesOfType(VolumeLabel, PathToDrive, IsDriveReady, DriveType.Removable)

to get all removable drives. If you want to get only USB memory sticks, remember that drives A and B are floppy disks. The output, if you use similar ListBox output as above, would look like this:

VolumeLabel; PathToDrive; IsDriveReady
; A:; False
PORTABLEAPP; I:; True

So, the only USB stick drive would have a drive letter "I".
Wednesday, September 24, 2008

Concatenate strings in VB.NET

VB.NET introduced a new way to concatenate strings, StringBuilder class. In VB.NET strings are immutable. This means that once a string is created its value can not be changed. So when your code concatenates strings, the strings themselves pointed by a string variable does not change. Instead a new string object is created and the string variable starts to reference this new string object.

Does this make any difference when concatenating strings in VB.NET code? Not really if you have a simple: MyString = "Hello " & "world!". But things get quite different when your code concatenates strings inside loops or you have otherwise excessive string manipulation in your code.

Concatenate strings with & -operator

Here's a simple procedure that makes concatenation in a loop with & -operator and finally shows elapsed time. Notice that the timing is done in a simple way. The timing in itself is not precise but enough to show the difference between two ways to concatenate strings.

Imports System.Text
''' <summary>
''' Concatenate strings with &amp; -operator
''' </summary>
''' <remarks></remarks>
Public Sub ConcatenateString()
  '
  Dim StartTime As DateTime
  Dim Elapsed As Double
  Dim ResultString As String
  Dim TempStr As String
  Dim i As Integer

  ResultString = ""
  TempStr = "Lorem ipsum dolor sit amet, consectetuer adipiscing elit."
  StartTime = System.DateTime.Now
  For i = 0 To 9999
    ResultString = ResultString & "Line " & i & " " & TempStr & Environment.NewLine
  Next i
  Elapsed = System.DateTime.Now.Subtract(StartTime).TotalMilliseconds
  MessageBox.Show("Elapsed time " & Elapsed.ToString & " ms with & -operator", _
    "Elapsed Time", _
    MessageBoxButtons.OK, _
    MessageBoxIcon.Information)

End Sub

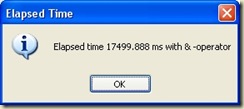
and the result is

Concatenate String with & -operator

Concatenate strings with StringBuilder class

Below is the same procedure as above. Now the concatenation of the strings is done with the StringBuilder object.

Imports System.Text
''' <summary>
''' Concatenate strings with StringBuilder
''' </summary>
''' <remarks></remarks>
Public Sub ConcatenateStringBuilder()
  '
  Dim StartTime As DateTime
  Dim Elapsed As Double
  Dim ResultString As String
  Dim TempStr As String
  Dim oStrBuilder As StringBuilder
  Dim i As Integer

  ResultString = ""
  TempStr = "Lorem ipsum dolor sit amet, consectetuer adipiscing elit."
  oStrBuilder = New StringBuilder()
  StartTime = System.DateTime.Now
  For i = 0 To 9999
    oStrBuilder.Append("Line ")
    oStrBuilder.Append(i)
    oStrBuilder.Append(" ")
    oStrBuilder.Append(TempStr)
    oStrBuilder.Append(Environment.NewLine)
  Next i
  ' Move the result to ResultString variable
  ResultString = oStrBuilder.ToString
  Elapsed = System.DateTime.Now.Subtract(StartTime).TotalMilliseconds
  MessageBox.Show("Elapsed time " & Elapsed.ToString & " ms with StringBuilder", _
    "Elapsed Time", _
    MessageBoxButtons.OK, _
    MessageBoxIcon.Information)

End Sub

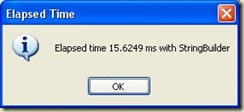
and now the result is

Concatenate String with StringBuilder

Conclusions

In the codes above the difference between methods was 17.5 seconds versus 0.015 seconds. So the conclusion is clear, StringBuilder class gave over 1 000 times faster results than & -operator. When your code concatenates strings inside loops or you have otherwise excessive string manipulation, use StringBuilder class to get most of your application.  But as I stated in the beginning of this post, & -operator is still useful. Using StringBuilder class in each and every simple concatenation of the strings would be an overkill.

But there's much more in StringBuilder class than just concatenating strings. Check Microsoft's reference for a complete list of the features StringBuilder class has to offer.

Monday, September 22, 2008

Using compiler directives with VB.NET

With VB.NET Microsoft introduced compiler directives to Visual Basic language. Compiler directives have been around for a long time in other languages and compilers and now they are also part of Visual Basic.

There are four compiler directives in VB.NET:

  • #Const directive
  • #ExternalSource directive
  • #If...Then...#Else directive
  • #Region directive

ExternalSource directive

Directive is used for mapping between specific lines of source code and external source text. See Microsoft's reference for information about this directive.

Region directive

With #Region "name"...#End Region directive you can organize source code to the blocks in the editor. These blocks have "+"-sign to "open" the block and "-"-sign to "hide" the block. When a block is hidden, only the "+"-sign followed by region's name are visible. This is very handy if the source file is long. You can put for example all helper routines to "helper"-region and form's event handlers to "form"-region. When blocks are collapsed, all you see is "helper" and "form" titles instead of lots of source code.

Const directive

This directive is commonly used in conjunction with #If directive. With #Const directive you can assign compiler variables which you can test with #If...Then...#Else directive.

#Const directives can be set from Project Properties to be global constants i.e. they are available in all project's modules. However, this is not possible with VB.NET Express Edition. If you are using Express Edition, #Const directive is only available in the module where it is defined.

If...Then...Else directive

#If...Then...#Else directive is the most flexible and the most useful VB.NET compiler directive. Below are a few samples for what you can do with this directive.

Conditional compiling:

#Const TargetOS = "Vista"

#If TargetOS = "Vista" Then
   ' Windows Vista specific code
#ElseIf TargetOS = "WinXP" Then
   ' Windows XP specific code
#Else
   ' Code for other OS
#End if

With conditional compiling you can write operating system, processor specific or other target platform specific code to the same source file. Changing #Const directive value and recompiling code gives you platform specific executables without maintaining multiple source codes for the same application.

Simple localization:

#Const Language = "French"

#If Language = "French" Then
   ' Show message to user in French
#Else
   ' Show message to user in English
#End if

If you have a simple user interface in your application or otherwise do not need a full localization, you can make a simple localization with conditional compiling.

Debugging code in source code:

#Const DebugMode = True

Public Sub DoSomething(ByVal ArgNumber As Integer)
#If DebugMode = True Then
  Debug.WriteLine("Entered sub DoSomething with argument: " & ArgNumber)
#End If
  ' Rest of procedure code

End Sub 

When you are on the development and coding phase of the application, you usually have more or less code for debugging purpose. Debugging code is something that you must never leave in the final production code. And debug dumps are something that your customers should never see. Again, conditional compiling is an easier solution than maintaining multiple source codes for the same application.

Friday, September 19, 2008

Get default application in Windows XP or Vista with VB.NET

When you double click a file, Windows Explorer opens it with associated default application. Windows Explorer determines current default application with file's extension and with information that is stored in the Windows registry. Obtaining the default application with VB.NET is not a difficult task. Default application can be found in both Windows XP and Windows Vista with the same VB.NET code.

Windows stores known file extensions in HKEY_CLASSES_ROOT registry hive. So, the first thing is to check if file extension exists in the registry. If the file extension exists, it has a so called ProgID associated with it. For example, file extension ".txt" has a ProgID "txtfile". Next step is to locate this ProgID registry key and check if it has a sub key "\shell\open\command". This sub key contains finally the path and the name of the default application. In the case of "txtfile" registry key, the default application could be "%SystemRoot%\system32\NOTEPAD.EXE %1".

The VB.NET function below returns the name of the default application, if it exists. Additionally it returns a ready-to-execute string which can be used with VB.NET's Shell command. First parameter in the function is a parameter string for default application. Second parameter is the actual file extension we are searching for.

''' <summary>
''' Return registered application by file's extension
''' </summary>
''' <param name="ParamFileName">Parameter for ShellAppName</param>
''' <param name="FileExtension">File extension</param>
''' <param name="AppName">Returns application name if any</param>
''' <param name="ShellAppName">Returns a string with application name and file name as its parameter</param>
''' <returns>True if the default application for this file type was found</returns>
''' <remarks>This function is Windows XP and Vista compatible</remarks>
Public Function GetRegisteredApplication(ByVal ParamFileName As String, ByVal FileExtension As String, _
 ByRef AppName As String, ByRef ShellAppName As String) As Boolean
 '
 ' Return registered application by file's extension
 '
 Dim StrExt As String
 Dim StrProgID As String
 Dim StrExe As String
 Dim oHKCR As RegistryKey ' HKEY_CLASSES_ROOT
 Dim oProgID As RegistryKey
 Dim oOpenCmd As RegistryKey
 Dim TempPos As Integer

 Try
   ' Add starting dot to extension
   StrExt = "." & FileExtension
   ' Get Programmatic Identifier for this extension
   Try
     oHKCR = Registry.ClassesRoot
     oProgID = oHKCR.OpenSubKey(StrExt)
     StrProgID = oProgID.GetValue(Nothing).ToString
     oProgID.Close()
   Catch
     ' No ProgID, return false
     Return False
   End Try
   ' Get associated application
   Try
     oOpenCmd = oHKCR.OpenSubKey(StrProgID & "\shell\open\command")
     StrExe = oOpenCmd.GetValue(Nothing).ToString
     oOpenCmd.Close()
   Catch
     ' Missing default application
     Return False
   End Try
   TempPos = StrExe.IndexOf(" %1")
   If TempPos > 0 Then
     ' Replace %1 placeholder with ParamFileName
     StrExe = StrExe.Substring(0, TempPos)
     AppName = StrExe
     StrExe = StrExe & " " & Convert.ToChar(34) & ParamFileName & Convert.ToChar(34)
     ShellAppName = StrExe
   Else
     ' No %1 placeholder found, append ParamFileName
     AppName = StrExe
     ShellAppName = StrExe & " " & Convert.ToChar(34) & ParamFileName & Convert.ToChar(34)
   End If
   Return True
 Catch ex As Exception
   Return False
 End Try

End Function

The function returns value True if the default application was found. If the function returns False, there was some error or some issue with registry permissions. In the latter case see System.Security.AccessControl namespace. That namespace provides methods to handle permission issues and how to set registry permissions.

To test this function, here's a code snippet for testing purpose. First create a new text file to C-drives root and name it "test.txt". When you run this snippet, it opens "test.txt" file with Notepad and displays message box:

Default application for text files

Default application for text files

This is, if you have Notepad as your default text editor.

Dim ApplicationName As String
Dim ShellApplicationName As String
Dim FileExtension As String
Dim ParamFileName As String

ApplicationName = ""
ShellApplicationName = ""
FileExtension = "txt"
ParamFileName = "C:\test.txt"
If GetRegisteredApplication(ParamFileName, FileExtension, ApplicationName, ShellApplicationName) Then
 Shell(ShellApplicationName)
 MessageBox.Show("Default application for the files of type '" & FileExtension & "'" & _
   " is '" & ApplicationName & "'", _
   "Default Application", _
   MessageBoxButtons.OK, _
   MessageBoxIcon.Exclamation)
Else
 MessageBox.Show("No default application found for the files of type '" & FileExtension & "'", _
   "Default Application", _
  MessageBoxButtons.OK, _
  MessageBoxIcon.Exclamation)
End If

Final words of warning. Always be careful when handling registry with your application. I have tested and used this code, and it does only read from the registry. But I will not give any kind of warranty if your registry gets messed up. So backup your registry first or otherwise make sure that you can restore your system if something goes wrong. You use this code totally at your own risk!

Tuesday, September 16, 2008

Make VB.NET application to start up from registry

There are basically two ways to start application when Windows starts. First and maybe the easiest way is to copy a shortcut to your application in Startup folder. Second way is to start up VB.NET application from the Windows registry.

Some installer applications can do this for you. But if you want to give users the option not to start application when Windows starts, you have to deal application starting programmatically.

Also, you have to make the decision if the application starts always when the Windows starts or if it starts only for the current user. The code below has a parameter which allows you to choose, which way the application starts.

A few words of warning. Always be careful when changing registry with your application. I have tested and used the code below. But I will not give any kind of warranty if your registry gets messed up. So backup your registry first or otherwise make sure that you can restore your system if something goes wrong. You use this code totally at your own risk!

Start application from the registry

Starting your VB.NET application from the registry is done by adding it to either HKEY_LOCAL_MACHINE\SOFTWARE\Microsoft\Windows\CurrentVersion\Run registry hive or HKEY_CURRENT_USER\SOFTWARE\Microsoft\Windows\CurrentVersion\Run registry hive.

Imports Microsoft.Win32
''' <summary>
''' Installs an application to start from the registry when Windows starts
''' </summary>
''' <param name="AppName">Application's name</param>
''' <param name="AppPath">Full path to the application</param>
''' <param name="InstallToLocalMachine">Install to LM, otherwise install to current user</param>
''' <returns>True if successfully installed</returns>
''' <remarks>Compatible with Windows XP and Vista</remarks>
Public Function StartUpInstall(ByVal AppName As String, ByVal AppPath As String, _
 ByVal InstallToLocalMachine As Boolean) As Boolean
 '
 ' Install to registry
 ' If LM then uses HKEY_LOCAL_MACHINE\SOFTWARE\Microsoft\Windows\CurrentVersion\Run
 ' Otherwise uses HKEY_CURRENT_USER\SOFTWARE\Microsoft\Windows\CurrentVersion\Run
 '
 Dim RegRoot As RegistryKey
 Dim RegKey As RegistryKey

 Try
   If InstallToLocalMachine Then
     RegRoot = Microsoft.Win32.Registry.LocalMachine
     RegKey = RegRoot.OpenSubKey("SOFTWARE\Microsoft\Windows\CurrentVersion\Run", _
       RegistryKeyPermissionCheck.ReadWriteSubTree, _
       Security.AccessControl.RegistryRights.SetValue)
     RegKey.SetValue(AppName, AppPath, RegistryValueKind.String)
     Return True
   Else
     RegRoot = Microsoft.Win32.Registry.CurrentUser
     RegKey = RegRoot.OpenSubKey("SOFTWARE\Microsoft\Windows\CurrentVersion\Run", _
       RegistryKeyPermissionCheck.ReadWriteSubTree, _
       Security.AccessControl.RegistryRights.SetValue)
     RegKey.SetValue(AppName, AppPath, RegistryValueKind.String)
     Return True
   End If
 Catch ex As Exception
   Return False
 End Try

End Function

If everything goes right, the function returns True. Otherwise operation failed. The most common reason for failure is inadequate permissions to modify the registry.

Removing application from registry

If you do not want to start the application from the registry it can be done simply by deleting application's entry from the registry.

Imports Microsoft.Win32
''' <summary>
''' Uninstalls an application not to start from the registry when Windows starts
''' </summary>
''' <param name="AppName">Application's name</param>
''' <param name="InstallToLocalMachine">Uninstall from LM, otherwise uninstall from current user</param>
''' <returns>True if successfully uninstalled</returns>
''' <remarks>Compatible with Windows XP and Vista</remarks>
Public Function StartUpUnInstall(ByVal AppName As String, _
 ByVal InstallToLocalMachine As Boolean) As Boolean
 '
 ' Uninstall from registry
 ' If LM then uses HKEY_LOCAL_MACHINE\SOFTWARE\Microsoft\Windows\CurrentVersion\Run
 ' Otherwise uses HKEY_CURRENT_USER\SOFTWARE\Microsoft\Windows\CurrentVersion\Run
 '
 Dim RegRoot As RegistryKey
 Dim RegKey As RegistryKey

 Try
   If InstallToLocalMachine Then
     RegRoot = Microsoft.Win32.Registry.LocalMachine
     RegKey = RegRoot.OpenSubKey("SOFTWARE\Microsoft\Windows\CurrentVersion\Run", _
       RegistryKeyPermissionCheck.ReadWriteSubTree, _
       Security.AccessControl.RegistryRights.SetValue)
     RegKey.DeleteValue(AppName, False)
     Return True
   Else
     RegRoot = Microsoft.Win32.Registry.CurrentUser
     RegKey = RegRoot.OpenSubKey("SOFTWARE\Microsoft\Windows\CurrentVersion\Run", _
       RegistryKeyPermissionCheck.ReadWriteSubTree, _
       Security.AccessControl.RegistryRights.SetValue)
     RegKey.DeleteValue(AppName, False)
     Return True
   End If
 Catch ex As Exception
   Return False
 End Try

End Function

Again, if everything goes right, the function returns True. Otherwise operation failed. And the most common reason for failure is inadequate permissions to modify the registry.

Compatibility with Windows Vista

I have used this code with standard user account in Windows Vista without any problems. I have also tested it with Windows XP, but not with any earlier Windows versions. However, if you do get problems with registry permissions, check out System.Security.AccessControl namespace. It provides methods to handle permission issues.

Monday, September 15, 2008

Epoch time in VB.NET

Unix and Unix-like systems, like Linuxes, use Unix Epoch time in system time and time handling libraries. Sometimes you may need to handle these Epoch times in VB.NET or simply convert Epoch times to VB.NET's DateTime type.

Unix Epoch is the number of seconds from midnight January 1, 1970 and value is commonly stored in signed 32-bit integer value. This, however, causes so called year 2038 problem because in January 19, 2038 value reaches 2 147 483 647 and after that "wraps around". But let's not worry about that.

Convert Unix Epoch time to VB.NET DateTime value

Next function returns non-negative Epoch time in VB.NET's DateTime format.

''' <summary>
''' Converts Unix's epoch time to VB DateTime value
''' </summary>
''' <param name="EpochValue">Epoch time (seconds)</param>
''' <returns>VB Date</returns>
''' <remarks></remarks>
Public Function EpochToDateTime(ByVal EpochValue As Integer) As Date
 '
 If EpochValue >= 0 Then
   Return CDate("1.1.1970 00:00:00").AddSeconds(EpochValue)
 Else
   Return CDate("1.1.1970 00:00:00")
 End If

End Function

With negative parameters, the value returned is the same as with Epoch time 0.

Convert VB.NET DateTime value to Unix's Epoch time

The function below converts DateTime type back to Unix's Epoch time.

''' <summary>
''' Converts VB DateTime value to Unix's epoch time
''' </summary>
''' <param name="DateTimeValue">DateTime to convert</param>
''' <returns>Epoch time (seconds)</returns>
''' <remarks></remarks>
Public Function DateTimeToEpoch(ByVal DateTimeValue As Date) As Integer
 '
 Try
   Return CInt(DateTimeValue.Subtract(CDate("1.1.1970 00:00:00")).TotalSeconds)
 Catch ex As System.OverflowException
   Return -1
 End Try

End Function

Since .NET's DateTime can store dates far beyond year 2038, function traps OverFlow exception. When you use this function, you have to check that the returned value is positive integer and consequently valid Epoch value.

Friday, September 5, 2008

The fastest way to fill ListView control

Filling ListView control with Add method in VB.NET is fast enough when you are dealing with only a few items. Things get different when you have to insert hundreds or maybe a few thousands items to ListView control. In this case the user may experience a noticeable delay in the application.

The solution is to use AddRange method which is the fastest way to fill ListView control. Below is the comparison of these two methods.

Fill ListView control with Add method

The sample code uses ListView control in Details-mode with one column. The loop inserts 10 000 items to control. Timing method is simple and it is not meant to provide neither totally exact nor precise timing.

''' <summary>
''' Fill listview with Add method
''' </summary>
''' <param name="ListView1">ListView object</param>
''' <remarks></remarks>
Public Sub FillListViewWithAdd(ByRef ListView1 As ListView)
 '
 Dim StartTime As DateTime
 Dim Elapsed As Double
 Dim TempStr() As String
 Dim TempNode As ListViewItem
 Dim i As Integer

 ListView1.View = View.Details
 ListView1.Columns.Clear()
 ListView1.Columns.Add("Name", 180)
 ListView1.Items.Clear()

 ReDim TempStr(0)
 StartTime = System.DateTime.Now
 For i = 0 To 9999
   TempStr(0) = "Name" & i.ToString
   TempNode = New ListViewItem(TempStr)
   TempNode.Tag = i.ToString
   ListView1.Items.Add(TempNode)
 Next i
 Elapsed = System.DateTime.Now.Subtract(StartTime).TotalMilliseconds
 MessageBox.Show("Elapsed time " & Elapsed.ToString & " ms with ListView.Add", _
   "Elapsed Time", _
   MessageBoxButtons.OK, _
   MessageBoxIcon.Information)

End Sub

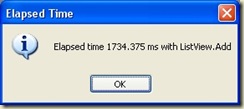
And the result is:

Timing of ListView.Add method

Fill ListView control with AddRange method

The sample code is basically same as above. Only differences are storing first ListViewItems to array and after that using AddRange method to insert items to ListView control.

''' <summary>
''' Fill listview with AddRange method
''' </summary>
''' <param name="ListView1">ListView object</param>
''' <remarks></remarks>
Public Sub FillListViewWithAddRange(ByRef ListView1 As ListView)
 '
 Dim StartTime As DateTime
 Dim Elapsed As Double
 Dim TempStr() As String
 Dim TempNode As ListViewItem
 Dim TempArr() As ListViewItem
 Dim i As Integer

 ListView1.View = View.Details
 ListView1.Columns.Clear()
 ListView1.Columns.Add("Name", 180)
 ListView1.Items.Clear()

 ReDim TempStr(0)
 ReDim TempArr(9999)
 StartTime = System.DateTime.Now
 For i = 0 To 9999
   TempStr(0) = "Name" & i.ToString
   TempNode = New ListViewItem(TempStr)
   TempNode.Tag = i.ToString
   TempArr(i) = TempNode
 Next i
 ListView1.Items.AddRange(TempArr)
 Elapsed = System.DateTime.Now.Subtract(StartTime).TotalMilliseconds
 MessageBox.Show("Elapsed time " & Elapsed.ToString & " ms with ListView.AddRange", _
   "Elapsed Time", _
   MessageBoxButtons.OK, _
   MessageBoxIcon.Information)

End Sub

And the result is:

Timing of ListView.AddRange method

Add method versus AddRange method

The conclusion is very clear. AddRange method offers the fastest way to fill ListView control. In the sample codes above the AddRange method was five times faster compared to Add method. This does not make Add method obsolete by any means. When you are dealing with only a few or a few hundreds of items, you may well use Add method.